
반응형
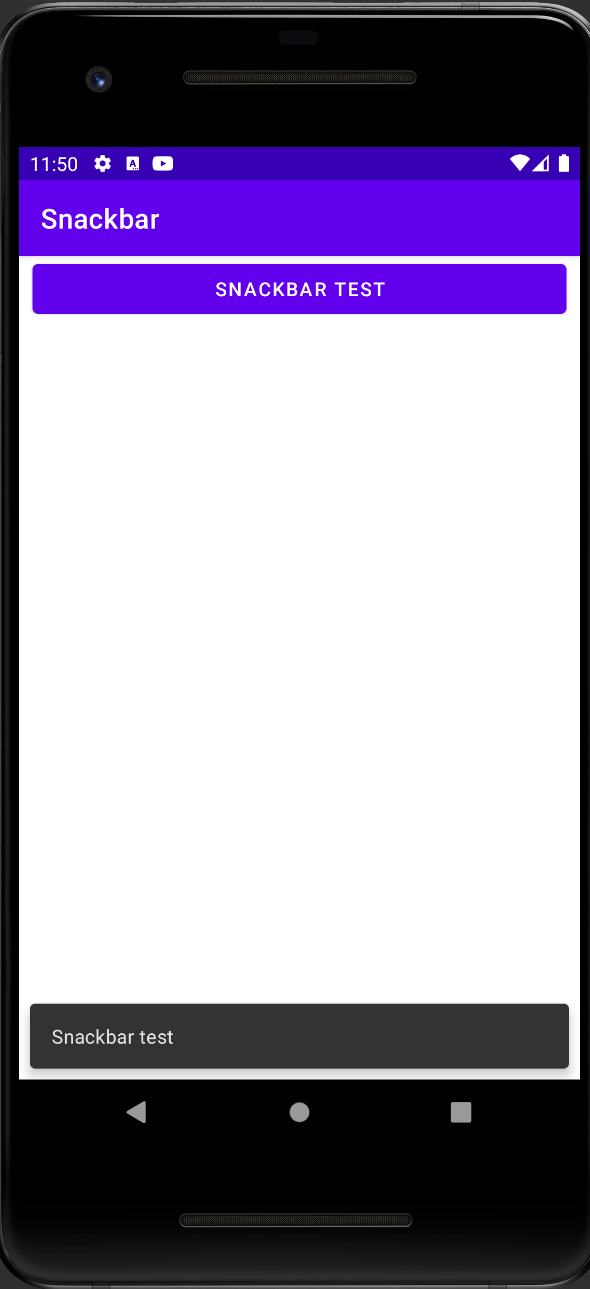
Android에서 간단한 메세지를 보여줄때 Toast도 사용하지만, Snackbar를 사용하는 경우도 있다. Snackbar는 Toast와 달리 화면 하단에 메세지를 띄워서 간단한 피드백을 제공하는 UI이다. 아래와 같이 버튼을 누르면 Snackbar의 간단한 예제를 작성해 보자.
< activity_main.xml >
<?xml version="1.0" encoding="utf-8"?>
<LinearLayout xmlns:android="http://schemas.android.com/apk/res/android"
    xmlns:app="http://schemas.android.com/apk/res-auto"
    xmlns:tools="http://schemas.android.com/tools"
    android:layout_width="match_parent"
    android:layout_height="match_parent"
    tools:context=".MainActivity" >

    <Button
        android:id="@+id/button"
        android:layout_width="wrap_content"
        android:layout_height="wrap_content"
        android:layout_marginLeft="10dp"
        android:layout_marginRight="10dp"
        android:layout_weight="1"
        android:text="Snackbar test" />
</LinearLayout>< MainActivity.java >
package com.example.snackbar;

import androidx.appcompat.app.AppCompatActivity;

import android.os.Bundle;
import android.view.View;
import android.widget.Button;

import com.google.android.material.snackbar.Snackbar;

public class MainActivity extends AppCompatActivity {

    @Override
    protected void onCreate(Bundle savedInstanceState) {
        super.onCreate(savedInstanceState);
        setContentView(R.layout.activity_main);
        Button btn = findViewById(R.id.button);

        btn.setOnClickListener(new View.OnClickListener() {
            @Override
            public void onClick(View view) {
                // 첫번째 인자는 View이다.
                Snackbar.make(view,"Snackbar test",Snackbar.LENGTH_SHORT).show();
            }
        });
    }
}Snackbar는 Toast와 달리, 사용자에게 메세지를 응답받을 수 있다.
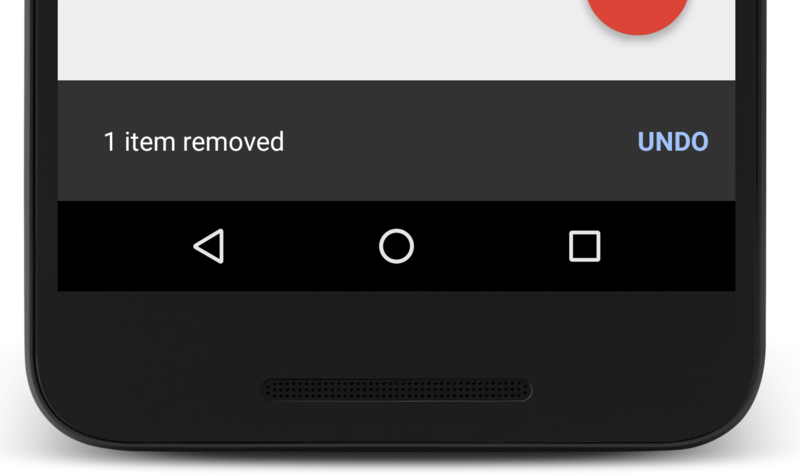
위 사진은 안드로이드 공식 문서 사이트에 있는 사진이다. 이 사진을 보면 Snackbar오른쪽에 "UNDO"라는 텍스트 버튼이 있는것을 볼 수 있다. 이 버튼을 누르면, Undo를 실행하게 된다.이를 구현하기 위해서는 Snackbar의 setAction() 메소드를 사용해야한다. setAction() 메소드는 string.xml에 저장된 String태그 id와 onClickListener를 매개변수를 받는다.
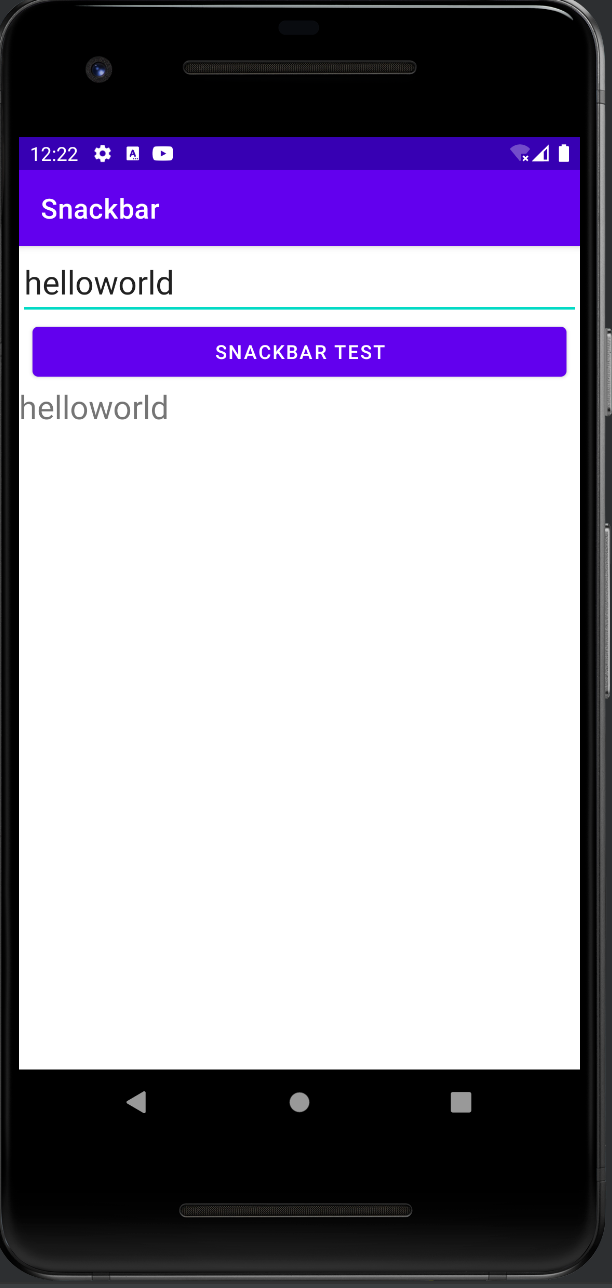
예를 들어서 EditText에 글자를 입력하고, 버튼을 누른 후 Snackbar의 ADD버튼을 누르면, TextView에 입력한 글자가 표시되는 예제를 작성한다고 가정하자.
MainActivity.java
package com.example.snackbar;

import androidx.appcompat.app.AppCompatActivity;

import android.os.Bundle;
import android.view.View;
import android.widget.Button;
import android.widget.EditText;
import android.widget.TextView;

import com.google.android.material.snackbar.Snackbar;

public class MainActivity extends AppCompatActivity {

    TextView textView;
    EditText textView2;
    @Override
    protected void onCreate(Bundle savedInstanceState) {
        super.onCreate(savedInstanceState);
        setContentView(R.layout.activity_main);
        Button btn = findViewById(R.id.button);
        textView = findViewById(R.id.textview);
        textView2 = findViewById(R.id.textview2);
        btn.setOnClickListener(new View.OnClickListener() {
            @Override
            public void onClick(View view) {
                //Clear text View
                textView.setText("");
                // 첫번째 인자는 View이다.
                Snackbar sb = Snackbar.make(view,"Snackbar test",Snackbar.LENGTH_SHORT);
                sb.setAction(R.string.add_to_text, new View.OnClickListener() {
                    @Override
                    public void onClick(View view) {
                        textView.append(textView2.getText());
                    }
                });
                sb.show();
            }
        });
    }
}activity_main.xml
<?xml version="1.0" encoding="utf-8"?>
<LinearLayout xmlns:android="http://schemas.android.com/apk/res/android"
    xmlns:app="http://schemas.android.com/apk/res-auto"
    xmlns:tools="http://schemas.android.com/tools"
    android:layout_width="match_parent"
    android:layout_height="match_parent"
    android:orientation="vertical"
    tools:context=".MainActivity" >
    <EditText
        android:id="@+id/textview2"
        android:layout_width="match_parent"
        android:layout_height="wrap_content"
        android:hint="Type text here"
        android:textSize="24sp"/>
    <Button
        android:id="@+id/button"
        android:layout_width="match_parent"
        android:layout_height="wrap_content"
        android:layout_marginLeft="10dp"
        android:layout_marginRight="10dp"
        android:text="Snackbar test" />
    <TextView
        android:id="@+id/textview"
        android:layout_width="match_parent"
        android:layout_height="wrap_content"
        android:hint="Snack Bar will append text here"
        android:textSize="24sp"/>
</LinearLayout>
반응형
'Android' 카테고리의 다른 글
| [Android] Inflation이란? (0) | 2022.04.08 |
|---|---|
| [Android] Progressbar 사용하기 (0) | 2022.04.07 |
| [Android] AlertDialog를 응용해보기 (0) | 2022.04.07 |
| [Android] 알림 대화상자 (0) | 2022.04.07 |
| [Android] onSaveInstanceState()로 액티비티 변수 보존하기 (0) | 2022.04.06 |