
안드로이드 환경을 사용하다 보면 아래와 같이 알림상자를 간혹 볼 수 있다.
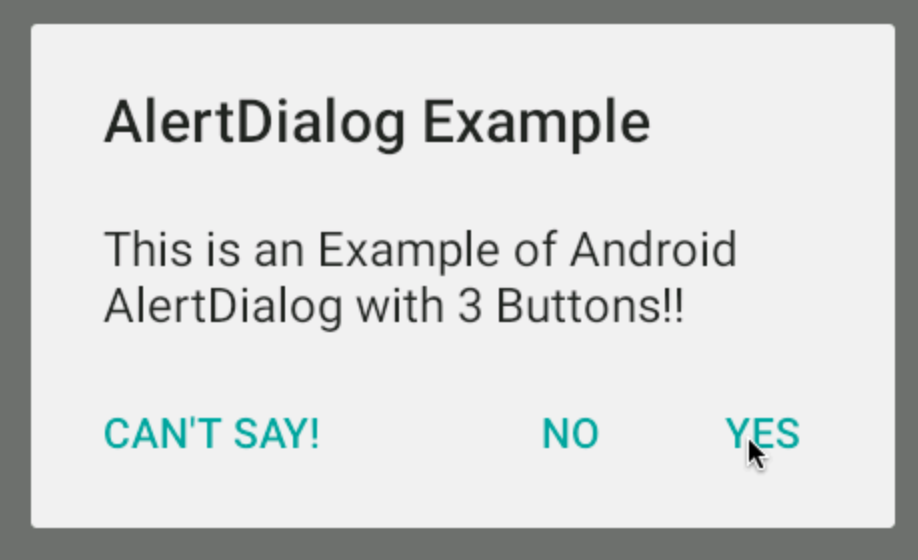
이러한 것을 알림 대화상자, AlertDialog라고 부르며, 이는 사용자에게 확인을 받거나 선택하게 할때 사용한다. Edit Text와 같이 사용자와의 상호작용을 위한것이 아닌 일방적인 메세지 전달의 역할이다. 아래 예시와 같이 레이아웃과 MainActivity.java 파일을 작성하자
activity_main.xml
<?xml version="1.0" encoding="utf-8"?>
<LinearLayout xmlns:android="http://schemas.android.com/apk/res/android"
    xmlns:app="http://schemas.android.com/apk/res-auto"
    xmlns:tools="http://schemas.android.com/tools"
    android:layout_width="match_parent"
    android:layout_height="match_parent"
    android:orientation="vertical"
    tools:context=".MainActivity">

    <TextView
        android:id="@+id/textView"
        android:layout_width="match_parent"
        android:layout_height="wrap_content"
        android:hint="Press button and alert will be pop"
        android:textSize="40sp" />

    <LinearLayout
        android:layout_width="match_parent"
        android:layout_height="match_parent"
        android:orientation="horizontal">

        <Button
            android:id="@+id/button6"
            android:layout_width="wrap_content"
            android:layout_height="wrap_content"
            android:layout_margin="10dp"
            android:layout_weight="1"
            android:text="Alert Dialog" />
    </LinearLayout>

</LinearLayout>MainActivity.java
package com.example.sampletoast;
import androidx.appcompat.app.AlertDialog;
import androidx.appcompat.app.AppCompatActivity;
import android.content.DialogInterface;
import android.os.Bundle;
import android.view.KeyEvent;
import android.view.View;
import android.widget.Button;
import android.widget.TextView;
import com.google.android.material.snackbar.Snackbar;
import java.security.Key;
public class MainActivity extends AppCompatActivity {
TextView textView;
@Override
protected void onCreate(Bundle savedInstanceState) {
super.onCreate(savedInstanceState);
setContentView(R.layout.activity_main);
textView = findViewById(R.id.textView);
Button btn = findViewById(R.id.button6);
btn.setOnClickListener(new View.OnClickListener() {
@Override
public void onClick(View view) {
showmessage();
}
});
}
private void showmessage(){
AlertDialog.Builder builder = new AlertDialog.Builder(this);
builder.setTitle("안내");
builder.setMessage("종료하시겠습니까?");
builder.setIcon(android.R.drawable.ic_dialog_alert);
// "예" 버튼
builder.setPositiveButton("Yes", new DialogInterface.OnClickListener() {
@Override
public void onClick(DialogInterface dialogInterface, int i) {
String message = "Click Yes";
textView.setText(message);
}
});
// "취소" 버튼
builder.setNeutralButton("Cancel", new DialogInterface.OnClickListener() {
@Override
public void onClick(DialogInterface dialogInterface, int i) {
String message = "Click Cancel";
textView.setText(message);
}
});
//"아니오" 버튼
builder.setNegativeButton("No", new DialogInterface.OnClickListener() {
@Override
public void onClick(DialogInterface dialogInterface, int i) {
String message = "Click No";
textView.setText(message);
}
});
AlertDialog dialog = builder.create();
dialog.show();
}
public void snackbarclick(View v){
Snackbar.make(v, "Snackbar",Snackbar.LENGTH_SHORT).show();
}
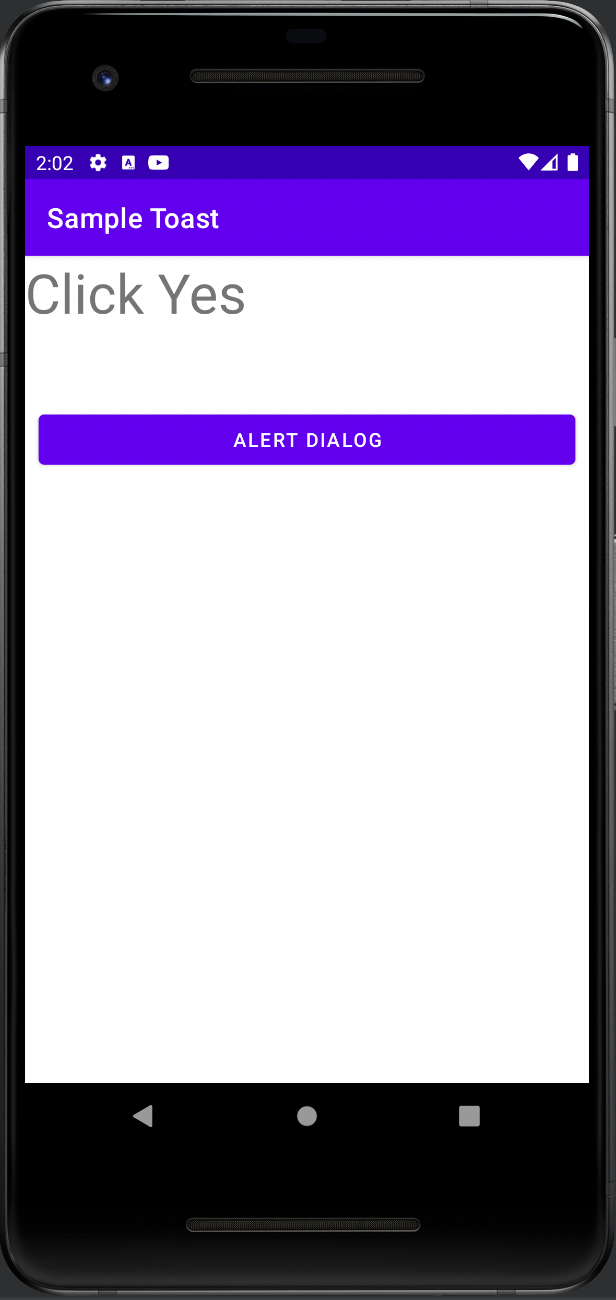
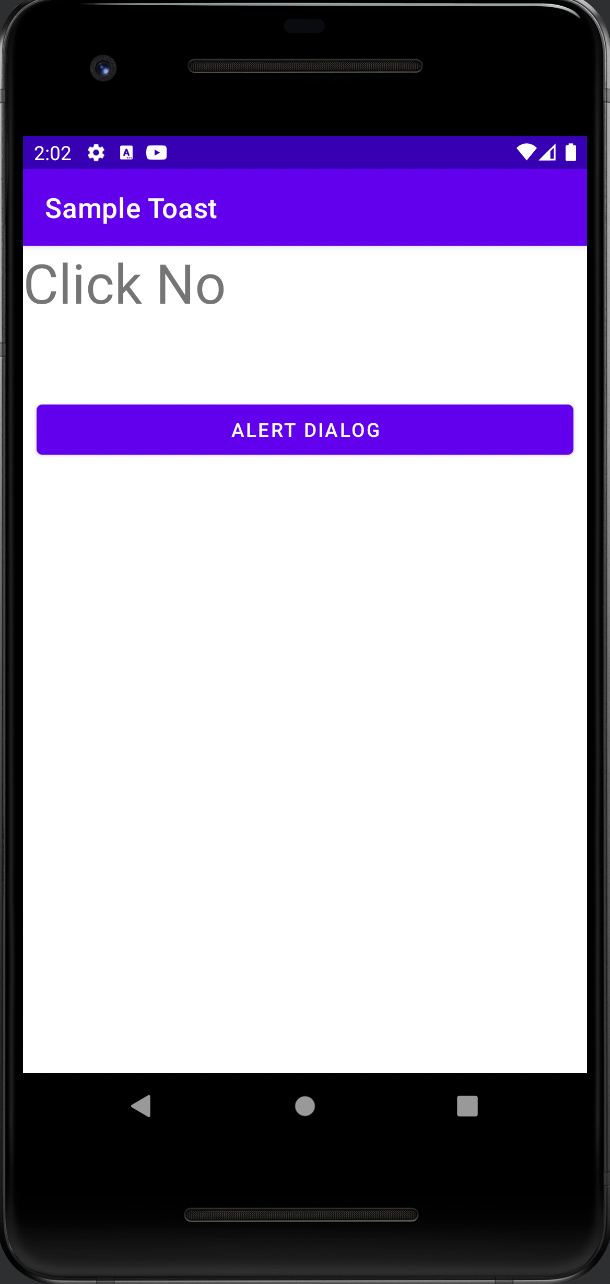
}우선 이 예제는 버튼을 누르면 나오는 AlertDialog의 세가지 버튼(취소, 예, 아니오)중 하나를 선택하면, 선택한 버튼을 TextView에 표시해 주는 예시이다. 위의 코드를 보면 알겠지만, 버튼의 onClickListener에 이벤트 발생시, showmessage()라는 메소드를 실행하게끔 작성되어있다. 여기까지는 흔한 이벤트 처리기 등록이다. 이제 showmessage() 메소드를 살펴보자
showmessage()메소드는 AlertDialog를 생성하고, 띄우기 위한 메소드이다. 우선 핵심 부분을 살펴보자
빌더 객체 생성
AlertDialog.Builder builder = new AlertDialog.Builder(this);AlertDialog를 생성하기 위해서는 AlertDialog의 빌더 객체를 생성해야한다. 빌더 객체는 AlertDialog.Builder이다. 객체 생성자에는 Context객체를 넘겨주어야 한다(this 혹은 getApplicationContext())
빌더 객체에 title,message,icon설정하기
builder.setTitle("안내");
builder.setMessage("종료하시겠습니까?");
builder.setIcon(android.R.drawable.ic_dialog_alert);- AlertDialog.Builder.setTitle() : 대화상자의 제목을 설정한다
- AlertDialog.Builder.setMessage() : 대화상자가 사용자에게 물어볼 메세지를 설정한다
- AlertDialog.Builder.setIcon() : 대화상자의 아이콘을 설정한다. 만약 안드로이드 기본 API에 포함된 아이콘을 사용하고 싶은 경우, android.R.drawable중 선택하면 된다.
버튼 지정하기
// "예" 버튼
        builder.setPositiveButton("Yes", new DialogInterface.OnClickListener() {
            @Override
            public void onClick(DialogInterface dialogInterface, int i) {
                String message = "Click Yes";
                textView.setText(message);
            }
        });
        // "취소" 버튼
        builder.setNeutralButton("Cancel", new DialogInterface.OnClickListener() {
            @Override
            public void onClick(DialogInterface dialogInterface, int i) {
                String message = "Click Cancel";
                textView.setText(message);
            }
        });
        //"아니오" 버튼
        builder.setNegativeButton("No", new DialogInterface.OnClickListener() {
            @Override
            public void onClick(DialogInterface dialogInterface, int i) {
                String message = "Click No";
                textView.setText(message);
            }
}AlertDialog에는 세개의 버튼을 지정해 줄 수 있다. 이 버튼들은 모두 OnClickListener를 설정해 줄 수 있다(기본적으로 OnClickListener를 사용하지 않더라도 인터페이스 구현을 위해 Override는 해주어야함).
- setNeutralButton : 취소 버튼
- setNegativeButton : 아니오 버튼
- setPositiveButton : 예 버튼
Dialog 생성 및 사용자에게 보여주기
AlertDialog dialog = builder.create();
dialog.show();AlertDialog에 요소를 모두 넣었다면, 이제 builder객체를 AlertDialog 객체로 만들고 사용자에게 보여 주어야 한다. AlertDialog.Builder객체의 create()메소드로 AlertDialog객체를 완성시킬 수 있으며, AlertDialog의 show()메소드로 사용자에게 보여줄 수 있다.
결과를 한번 살펴보자 AlertDialog창에서 Yes,No,Cancel 각각 버튼을 누르면, TextView에 어떤 버튼을 선택하였는지 볼 수 있다.

'Android' 카테고리의 다른 글
| [Android] Snackbar사용하기 (0) | 2022.04.07 |
|---|---|
| [Android] AlertDialog를 응용해보기 (0) | 2022.04.07 |
| [Android] onSaveInstanceState()로 액티비티 변수 보존하기 (0) | 2022.04.06 |
| [Android] Touch,Gesture 이벤트 처리 (0) | 2022.03.28 |
| [Android] 예시 SMS 레이아웃 만들기 (0) | 2022.03.27 |
안드로이드 환경을 사용하다 보면 아래와 같이 알림상자를 간혹 볼 수 있다.
이러한 것을 알림 대화상자, AlertDialog라고 부르며, 이는 사용자에게 확인을 받거나 선택하게 할때 사용한다. Edit Text와 같이 사용자와의 상호작용을 위한것이 아닌 일방적인 메세지 전달의 역할이다. 아래 예시와 같이 레이아웃과 MainActivity.java 파일을 작성하자
activity_main.xml
<?xml version="1.0" encoding="utf-8"?>
<LinearLayout xmlns:android="http://schemas.android.com/apk/res/android"
    xmlns:app="http://schemas.android.com/apk/res-auto"
    xmlns:tools="http://schemas.android.com/tools"
    android:layout_width="match_parent"
    android:layout_height="match_parent"
    android:orientation="vertical"
    tools:context=".MainActivity">

    <TextView
        android:id="@+id/textView"
        android:layout_width="match_parent"
        android:layout_height="wrap_content"
        android:hint="Press button and alert will be pop"
        android:textSize="40sp" />

    <LinearLayout
        android:layout_width="match_parent"
        android:layout_height="match_parent"
        android:orientation="horizontal">

        <Button
            android:id="@+id/button6"
            android:layout_width="wrap_content"
            android:layout_height="wrap_content"
            android:layout_margin="10dp"
            android:layout_weight="1"
            android:text="Alert Dialog" />
    </LinearLayout>

</LinearLayout>
MainActivity.java
package com.example.sampletoast;

import androidx.appcompat.app.AlertDialog;
import androidx.appcompat.app.AppCompatActivity;

import android.content.DialogInterface;
import android.os.Bundle;
import android.view.KeyEvent;
import android.view.View;
import android.widget.Button;
import android.widget.TextView;

import com.google.android.material.snackbar.Snackbar;

import java.security.Key;

public class MainActivity extends AppCompatActivity {

    TextView textView;

    @Override
    protected void onCreate(Bundle savedInstanceState) {
        super.onCreate(savedInstanceState);
        setContentView(R.layout.activity_main);
        textView = findViewById(R.id.textView);
        Button btn = findViewById(R.id.button6);
        btn.setOnClickListener(new View.OnClickListener() {
            @Override
            public void onClick(View view) {
                showmessage();
            }
        });
    }

    private void showmessage(){
        AlertDialog.Builder builder = new AlertDialog.Builder(this);
        builder.setTitle("안내");
        builder.setMessage("종료하시겠습니까?");
        builder.setIcon(android.R.drawable.ic_dialog_alert);

        // "예" 버튼
        builder.setPositiveButton("Yes", new DialogInterface.OnClickListener() {
            @Override
            public void onClick(DialogInterface dialogInterface, int i) {
                String message = "Click Yes";
                textView.setText(message);
            }
        });
        // "취소" 버튼
        builder.setNeutralButton("Cancel", new DialogInterface.OnClickListener() {
            @Override
            public void onClick(DialogInterface dialogInterface, int i) {
                String message = "Click Cancel";
                textView.setText(message);
            }
        });
        //"아니오" 버튼
        builder.setNegativeButton("No", new DialogInterface.OnClickListener() {
            @Override
            public void onClick(DialogInterface dialogInterface, int i) {
                String message = "Click No";
                textView.setText(message);
            }
        });

        AlertDialog dialog = builder.create();
        dialog.show();
    }
    public void snackbarclick(View v){
        Snackbar.make(v, "Snackbar",Snackbar.LENGTH_SHORT).show();
    }
}
우선 이 예제는 버튼을 누르면 나오는 AlertDialog의 세가지 버튼(취소, 예, 아니오)중 하나를 선택하면, 선택한 버튼을 TextView에 표시해 주는 예시이다. 위의 코드를 보면 알겠지만, 버튼의 onClickListener에 이벤트 발생시, showmessage()라는 메소드를 실행하게끔 작성되어있다. 여기까지는 흔한 이벤트 처리기 등록이다. 이제 showmessage() 메소드를 살펴보자
showmessage()메소드는 AlertDialog를 생성하고, 띄우기 위한 메소드이다. 우선 핵심 부분을 살펴보자
빌더 객체 생성
AlertDialog.Builder builder = new AlertDialog.Builder(this);AlertDialog를 생성하기 위해서는 AlertDialog의 빌더 객체를 생성해야한다. 빌더 객체는 AlertDialog.Builder이다. 객체 생성자에는 Context객체를 넘겨주어야 한다(this 혹은 getApplicationContext())
빌더 객체에 title,message,icon설정하기
builder.setTitle("안내");
builder.setMessage("종료하시겠습니까?");
builder.setIcon(android.R.drawable.ic_dialog_alert);- AlertDialog.Builder.setTitle() : 대화상자의 제목을 설정한다
- AlertDialog.Builder.setMessage() : 대화상자가 사용자에게 물어볼 메세지를 설정한다
- AlertDialog.Builder.setIcon() : 대화상자의 아이콘을 설정한다. 만약 안드로이드 기본 API에 포함된 아이콘을 사용하고 싶은 경우, android.R.drawable중 선택하면 된다.
버튼 지정하기
// "예" 버튼
        builder.setPositiveButton("Yes", new DialogInterface.OnClickListener() {
            @Override
            public void onClick(DialogInterface dialogInterface, int i) {
                String message = "Click Yes";
                textView.setText(message);
            }
        });
        // "취소" 버튼
        builder.setNeutralButton("Cancel", new DialogInterface.OnClickListener() {
            @Override
            public void onClick(DialogInterface dialogInterface, int i) {
                String message = "Click Cancel";
                textView.setText(message);
            }
        });
        //"아니오" 버튼
        builder.setNegativeButton("No", new DialogInterface.OnClickListener() {
            @Override
            public void onClick(DialogInterface dialogInterface, int i) {
                String message = "Click No";
                textView.setText(message);
            }
        }
AlertDialog에는 세개의 버튼을 지정해 줄 수 있다. 이 버튼들은 모두 OnClickListener를 설정해 줄 수 있다(기본적으로 OnClickListener를 사용하지 않더라도 인터페이스 구현을 위해 Override는 해주어야함).
- setNeutralButton : 취소 버튼
- setNegativeButton : 아니오 버튼
- setPositiveButton : 예 버튼
Dialog 생성 및 사용자에게 보여주기
AlertDialog dialog = builder.create();
dialog.show();
AlertDialog에 요소를 모두 넣었다면, 이제 builder객체를 AlertDialog 객체로 만들고 사용자에게 보여 주어야 한다. AlertDialog.Builder객체의 create()메소드로 AlertDialog객체를 완성시킬 수 있으며, AlertDialog의 show()메소드로 사용자에게 보여줄 수 있다.
결과를 한번 살펴보자 AlertDialog창에서 Yes,No,Cancel 각각 버튼을 누르면, TextView에 어떤 버튼을 선택하였는지 볼 수 있다.
'Android' 카테고리의 다른 글
| [Android] Snackbar사용하기 (0) | 2022.04.07 |
|---|---|
| [Android] AlertDialog를 응용해보기 (0) | 2022.04.07 |
| [Android] onSaveInstanceState()로 액티비티 변수 보존하기 (0) | 2022.04.06 |
| [Android] Touch,Gesture 이벤트 처리 (0) | 2022.03.28 |
| [Android] 예시 SMS 레이아웃 만들기 (0) | 2022.03.27 |